Getting Started
ok so what ur gonna be needing if your gonna start map making for counter strike is:
-Wally (for making custom textures)
http://www.telefragged.com/wally/
-Valve Hammer 3.4 (the program to make the maps)
http://collective.valve-erc.com/index.php?go=hammer
-half life and CS 1.6 and a program called worldcraft that comes with hl
-Zoners tools (tools used to compile your map)
http://dev.valve-erc.com/index.php?go=zhlt
-Time and lots of it
Ok lets get started on setting up Valve Hammer first start it up Tools > options

click on game configurations then the first one which will say Configuration: click edit then add type in Counter-Strike.
Ok next Game Data files: Go to ur Half life files and look for a file with .fdg on the end like for me its C:\SIERRA/Worldcraft/halflife.fdg
there will be a few in there add them all also same in SIERRA go to Counter-Strike and there will be more .fdgs in there.
Next Texture Format should be WAD3 and map type should be Half life.
Next Game Ex Directory: go to C:\SIERRA\Counter-Strike\cstrike
Game Directory: C:\SIERRA\Counter-Strike\valve
RMF Directory: C:\Program Files\Valve Hammer Editor\maps
Now click on Build Program
Configuration:Put Counter-Strike in
Game Excutable: C:\SIERRA\Counter-Strike\cstrike.exe
Ok nows the time to get your Zoners tools out and put them on your Desktop (to make it easy) there should be 4 of them.
Back to build program
GSG:Click browse go to your Desktop one of the tools will have GSG on the end click that.
BSP:Do the same as above only click on the one with BSP on the end/
VIS:^Same
RAD:^Same
Place compiled maps in:C:\SIERRA\Counter-Strike\valve\maps
Now go to Textures
There will be a box click on add and go to your Half life folder and in there you will find things with .WADs on the end add all of them.Then go to your counter-strike folder and them will be more in there but with map names in from like De_Dust.WAD add them.
Then go to your Czero folder and there will be more of the maps you have been on get them all. Then click Apply and close the box.
Your first room
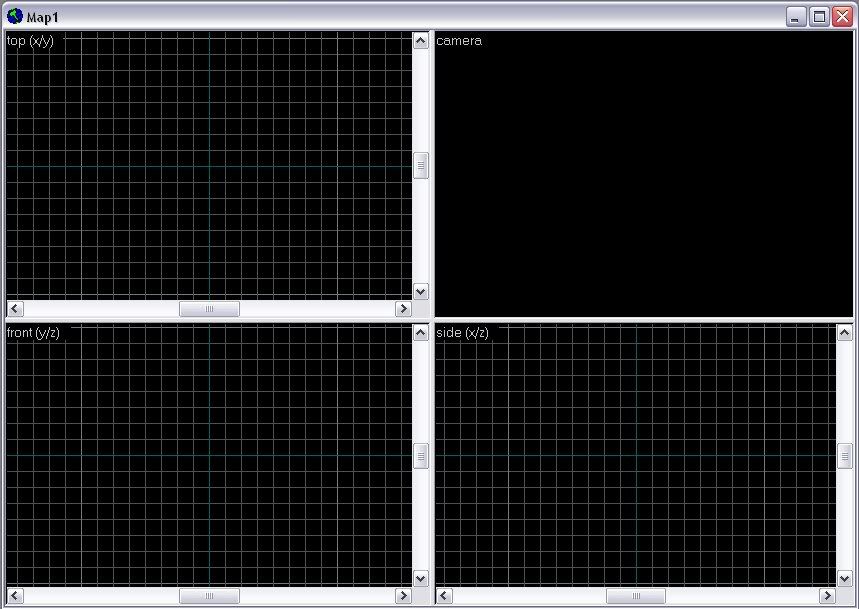
Ok lets get started file new now on you left you will see some icons click on the one that looks like a grey box.

Click on the upper left box then go to View click on 3D Texturd pol. Now click on the upper right box (with the grey box still selected)
and drag it across to make a not too big box and press Enter.

Now click on the top left box again then press Z and find what you have made it dosent matter what texture it is as long as you can see it. Now do another long line on the top right box next to what you have just done.(just touching not over)Then go to your bottom right box and raise it up a bit to make a wall and hit Enter.

I hope your starting to get the hang of it so do every other side.It should look like this:

if you get anything wrong click on the arrow at the top of the icons click on what you did wrong and you can change it.Ok now the roof on the top right box make a box over everything (the same size as the floor)then go to the bottom right box move it so its at the top like in the pic below and press Enter.

Ok now click on the icon just above the grey box that looks like a light bulb. Now look to the right and find a box that says (entities)
and the box bollow it should say info_player_start if not drop it down and find it. when you find it look back to your top right box drag and you should see a green box but it somewhere in your map then look to the bottom right box and raise it so its a bit above the ground in your room but not too high and not too low and hit Enter.This is where you will spawn.

Click on the thing that looks like a Light bulb again then where it said info_player_start drop the menu down and find Light. like what you did with info_player_start place drag it to your map put it near the roof but still in the box then press enter. Now right click it in your top right box go down to properties then find brightness the first number is 2 change it to 9 then close that box.You now have a light.

Now click on the icon bolow the grey box which has coulours on it a box should move to your right click browse and find a texture you like. Go to your top left box find a wall(press z to move around in this box) click the wall and click Apply in the box to youright do that to all the walls.

Stuck or confused use this
http://www.egir.dk/index.php?page=list_tutorials.php its good.
--Now thats you first room go to save as and put it somewhere.As im gonna continue this sometime in the week dont risk going any further yet!-- Reaper (Edit I know its been a while but Ive started the next part of this tutorial)